
My first attempt at how to make apple dessert cups was a disaster. I hollowed Gala apples with an apple corer and ended up with cups that split during baking.
After three experiments I learned which apples hold up, how to pack a spiced crumble so it stays crunchy, and how a quick torch makes them look expensive without a pastry chef’s budget.
You’ll get a beginner-friendly recipe that takes about 45 min hands-on, 1 hr total, and tricks to make the cups photograph-ready for guests.
Apples, warm spices, brown butter notes, and a bright citrus finish. This sits squarely in American comfort-dessert territory with a modern mini-desserts twist.
Plan on about 45 min hands-on, one easy tricky step (hollowing without breaking), and results that work for weeknight treats or a Sunday small-batch showpiece.
Pinterest and trend watching shows mini desserts and single-portion plates climbing in searches; I noticed this in 2023 and kept testing sizes until my guests stopped asking for forks and started taking photos.
1. Pick, Core, and Hollow for a Firm Cup
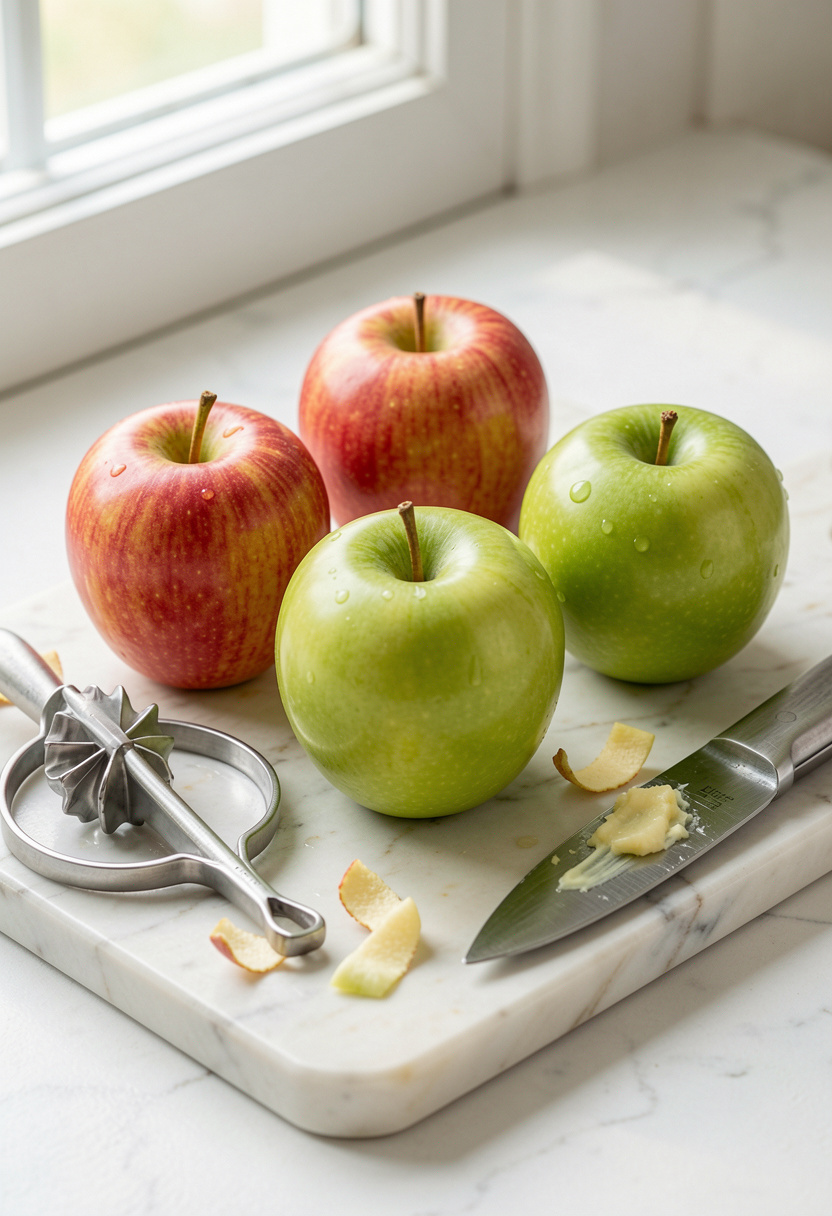
Start here because the wrong apple ruins everything. Firm apples with high acidity like Granny Smith or Pink Lady hold shape; softer Honeycrisp can collapse under heat.
Core apples with an apple corer around $7 to $15 and finish cavities with a sharp Victorinox paring knife 3.25 inch approx $12 to $20 so you get a uniform wall thickness of about 1/2 inch.
Salt the cavity lightly with Diamond Crystal kosher salt 3 lb box around $5 to $8 to draw a little surface moisture and tighten the flesh for baking.
The cooking principle: salt ahead of heat firms tissue by drawing out and reabsorbing moisture, so the apple keeps its cup shape. Hollow so lids remain attached if you want them.
Mistake to avoid: scooping too deep. If walls are thinner than 1/3 inch the apple will split. Make one measured pass and test one apple first.
2. Build a Spiced, Crunchy Filling That Stays Crisp
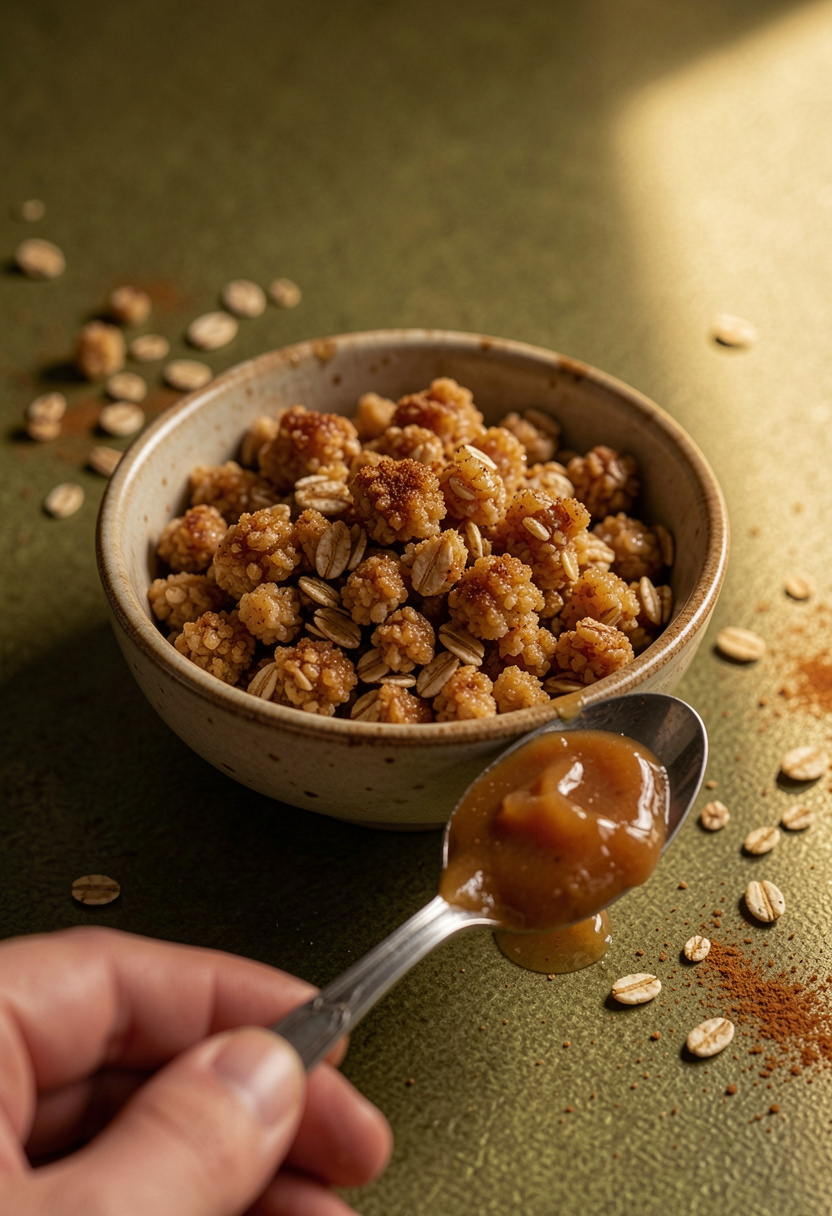
Crunch matters. I use a streusel-ish mix that combines toasted oats, nuts, and brown sugar so it stays crunchy on top even after baking.
Toast 3/4 cup Bob’s Red Mill rolled oats 18 oz around $4 to $8 in a dry pan 3 to 5 min until nutty, then toss with 1/3 cup chopped pecans, 1/3 cup Domino light brown sugar 2 lb around $3 to $6 and 3 tbsp melted Land O Lakes unsalted butter 1 lb approx $3 to $6.
Why this order: toasting maximizes the Maillard notes in oats and nuts so the filling tastes toasty, not cloying. Melted butter binds the crumbs without making them soggy.
Exact ratio: about 3 parts oats/nuts to 1 part sugar to 1 part butter by volume gives a holdable crumble. Fold in 1 tsp ground cinnamon and 1 tsp vanilla.
Mistake: dumping wet fruit into the crumble. If your apple cavity is watery, blot with paper towel. Wet mouths = soggy topping.
3. Bake for Deep Caramelization, Not Shrinkage
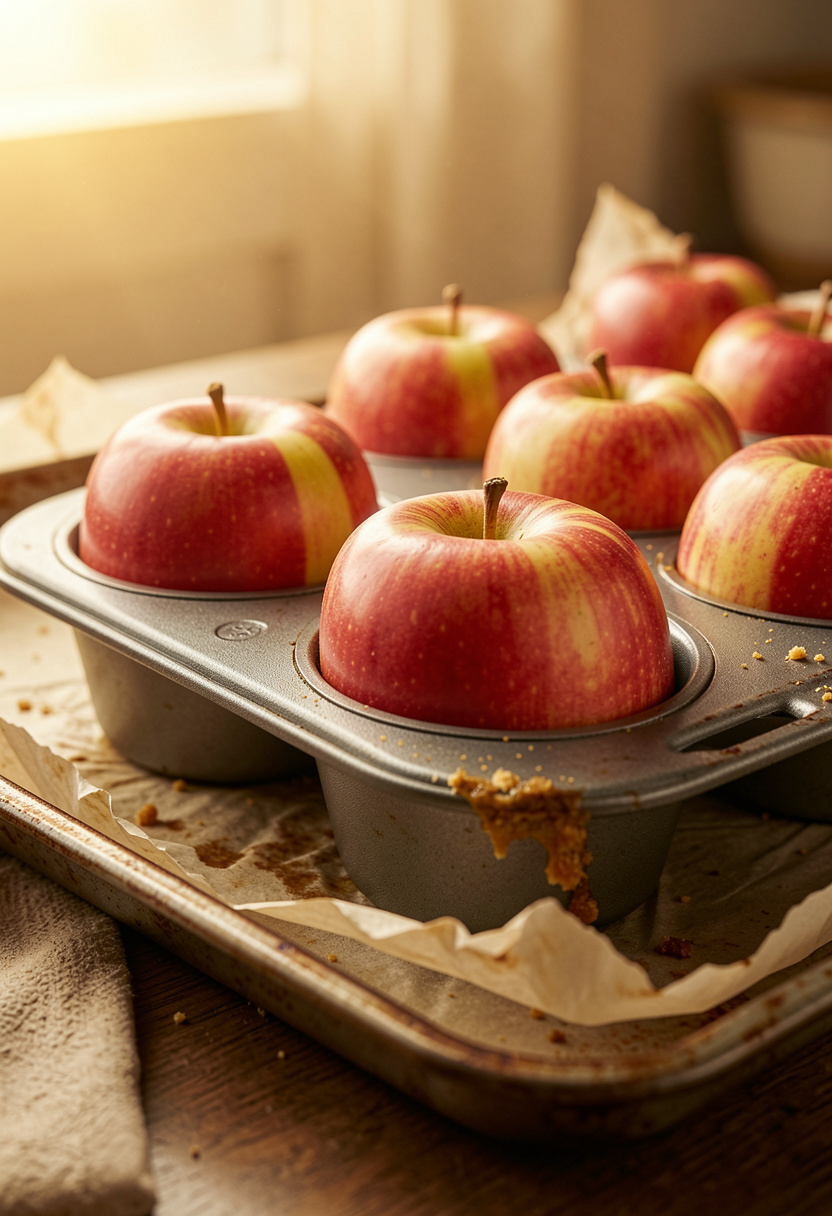
Keep apples upright and give them breathing room. Set hollowed apples in a nonstick muffin tin 12 cup around $10 to $18; place the tin on a half sheet pan approx $12 to $25 to catch drips.
Preheat oven to 375°F. Fill each cavity with a spoonful of the oat-pecan crumble and a teaspoon of butter. Bake 25 to 30 min until skins are blistered and the filling is golden. Tip: rotate the pan at 15 min for even color.
Principle: caramelization of apple sugars and the Maillard reaction on the crumble create layers of flavor. An internal cue: apples should be tender when pierced with a skewer but not mushy.
Common mistake: cranking the oven to 425°F to “brown faster.” High heat shrinks apples and chars edges. Moderate heat wins every time.
4. Dress, Torch, and Plate Like a Pro on a Budget
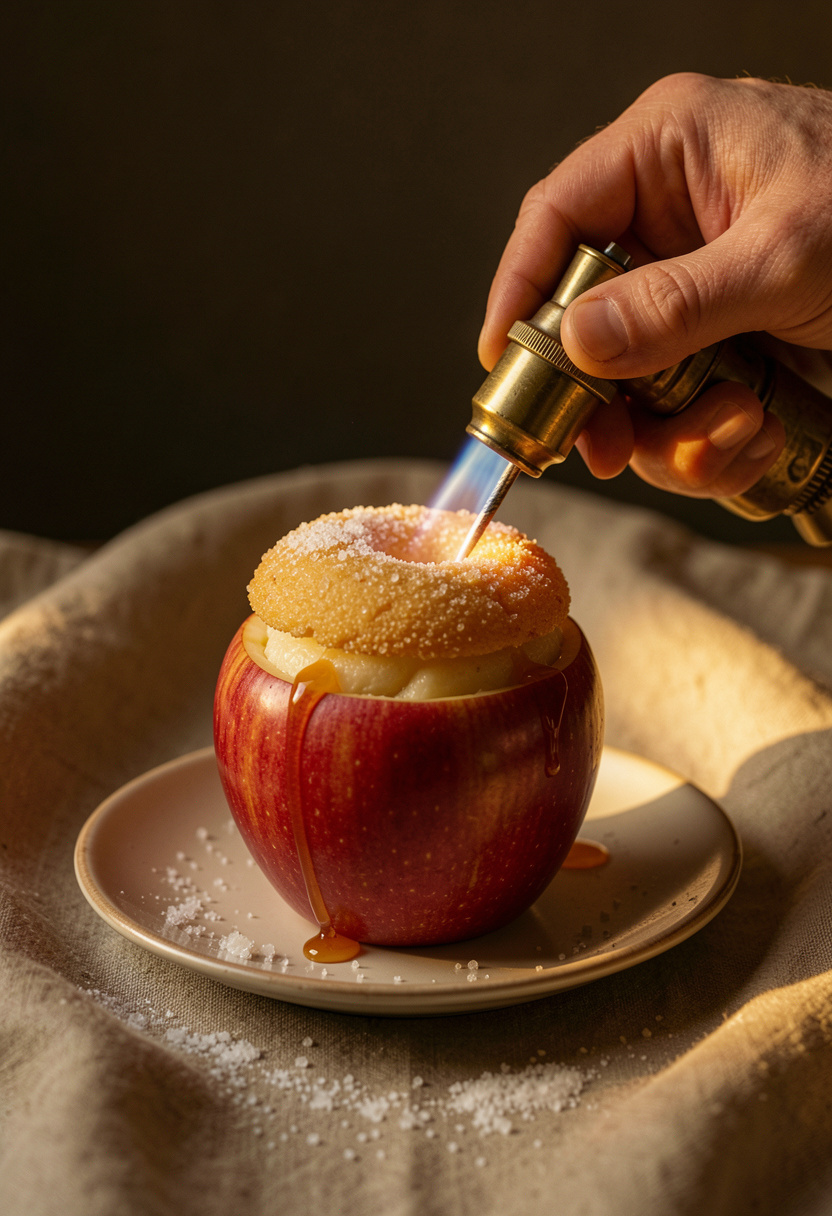
A torch makes everything look intentional. Sprinkle 1 tsp sugar on top of the crumble and quick-brûlée with a kitchen torch around $15 to $35 for a mirror finish.
Add a lemon zest bright note with a Microplane zester approx $10 to $20 and finish with flaky salt such as Maldon flaky sea salt 4.4 oz around $7 to $12 to lift sweetness.
For plating: set the apple on a cookie base like shortbread cookies approx $6 to $12 or a ramekin 4 oz set around $10 to $20 for elegant single-serve presentation.
The finishing principle is contrast: warm vs cool, crunchy vs smooth, sweet vs bright. If you want cream, whip 1/2 cup heavy cream 16 oz about 2 min until soft peaks.
Mistake: torching too long. Move quickly. A second too many and you scorch the apple skin.
Common Cooking Mistakes to Avoid
Mistake: Using soft baking apples only
Why it doesn't work: They collapse and leak juice, soggy base.
Do this instead: Choose firmer varieties and use an apple corer around $7 to $15.
Mistake: Overfilling the cavity with wet fruit
Why it doesn't work: Moisture turns the crumble to paste.
Do this instead: Blot the cavity and toast oats first; use a nonstick muffin tin 12 cup around $10 to $18 to keep shape.
Mistake: Rushing the browning with too-high heat
Why it doesn't work: Apples shrink and darken unevenly.
Do this instead: Bake at 375°F and finish with a kitchen torch around $15 to $35.
What You'll Need to Make This
Pantry Staples
Diamond Crystal kosher salt 3 lb box around $5 to $8
Domino light brown sugar 2 lb around $3 to $6
Ground cinnamon 3.3 oz approx $4 to $8
Specialty Ingredients
Maldon flaky sea salt 4.4 oz around $7 to $12
Shortbread cookies 7 oz approx $6 to $12
Tools That Earn Their Counter Space
Apple corer around $7 to $15
Nonstick muffin tin 12 cup around $10 to $18
Kitchen torch around $15 to $35
Cookbooks Worth the Shelf
Salt Fat Acid Heat (price range $18 to $28)
Half Baked Harvest Every Day (price range $18 to $30)
Budget Swaps
Microplane zester approx $10 to $20 (splurge if you zest often; a vegetable peeler works as a save)
Bob’s Red Mill rolled oats 18 oz around $4 to $8 (Aldi and bulk bins often have cheaper oats)
Shopping Guide for This Recipe
Pick firm apples: Choose Granny Smith or Pink Lady in season; look for firm flesh. Try farmer’s market or grocery bulk bins with extra firmness. Diamond Crystal kosher salt around $5 to $8.
Substitution hack: No butter? Use equal olive oil for toasting oats to keep crunch. Land O Lakes unsalted butter 1 lb approx $3 to $6.
2025 trend note: Mini desserts and single-serve plating are still rising; a kitchen torch around $15 to $35 is a small tool that makes a big visual impact.
Splurge vs save: Splurge on a good microplane for bright citrus finishing. Save on ramekins by using inexpensive shortbread cookies approx $6 to $12 as a base.
Conclusion
Start with the apple selection phase; it is the highest-impact choice for structure and flavor. The finishing touch of a quick torch, a pinch of flaky salt, and a microplane zest will make a budget-friendly dessert read as carefully plated.
A small investment in a kitchen torch around $15 to $35 pays off in presentation and repeat guests.
Will you try the crisp-topped version first or go straight for the brûléed finish?